

How to Declutter Kitchen Cabinets Before Organizing
Table of Contents
- Why Decluttering Before Organizing Saves Time and Stress
- Your Kitchen Decluttering Checklist: Prep and Mindset
- Step-by-Step: How to Declutter Kitchen Cabinets
- How to Organize Kitchen Cabinets by Category
- Best Kitchen Storage Solutions for a Functional Kitchen
- Overcoming Psychological Barriers to Decluttering
- Maintaining a Clutter-Free Kitchen: Schedules and Habits
- Conclusion
- Frequently Asked Questions
Last Updated: September 11, 2026
Why Decluttering Before Organizing Saves Time and Stress
Most people try to organize a cluttered cabinet and quit halfway through. You cannot organize chaos, you can only sort it first. Learning how to declutter kitchen cabinets before organizing makes every later step faster, and skipping it is why so many storage bins end up empty six months later.
Decluttering is subtraction: you remove what does not belong. Organizing is arrangement: you place what remains where you can reach it. Do them in the wrong order and you are just packing clutter into nicer containers.
The payoff is practical: a decluttered cabinet wipes down in minutes, its contents are visible at a glance, and the items you use stop competing with the ones you don't.
Your Kitchen Decluttering Checklist: Prep and Mindset
A kitchen decluttering checklist turns an overwhelming job into small, finishable tasks. Set aside two to three hours for a standard cabinet run, and gather supplies first (marthastewart.com).
What you'll need:
- Three boxes or bins, labeled Keep, Donate, and Discard
- A trash bag for anything broken or unsalvageable
- A damp cloth and a mild all-purpose cleaner
- A notepad for items you need to replace
- A phone or camera to photograph how things were arranged
The mindset piece is where most people stall. You are not deciding whether an item is good, but whether it earns its space in a kitchen you use every day, a far easier question.
One more prep step: work when you are not hungry and not rushed. Decision fatigue is real, and half-sorted piles are worse than a kitchen you never started (PubMed).
Step-by-Step: How to Declutter Kitchen Cabinets
The process works best one cabinet at a time, top to bottom, finished completely before you move on. That way you always have a working kitchen and can stop at any point without leaving a disaster.
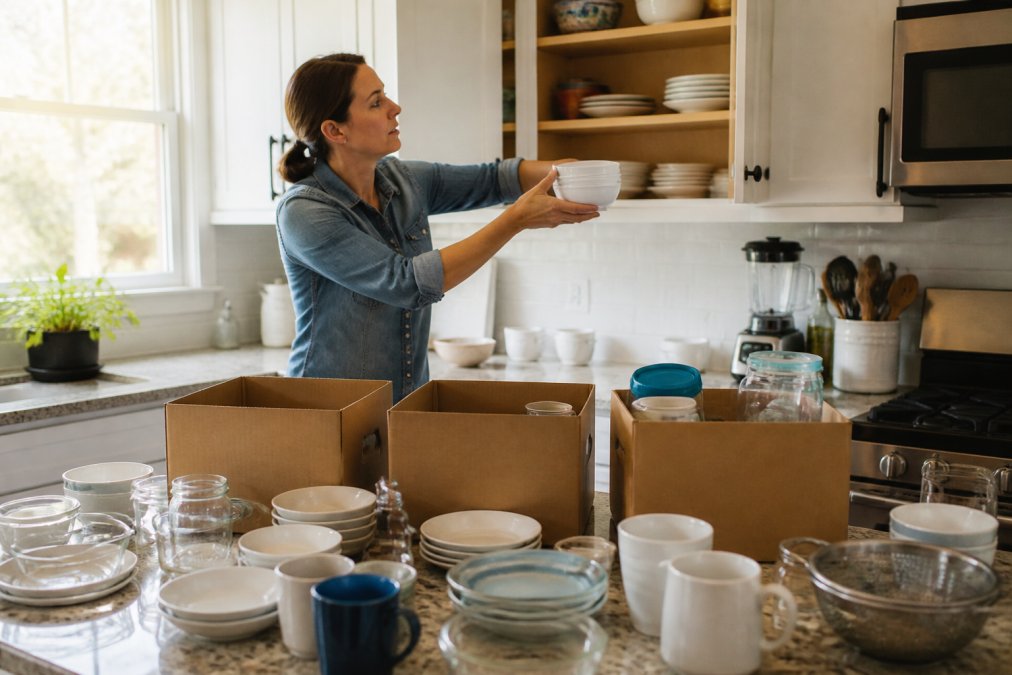
Step 1: Empty One Cabinet at a Time
Pull everything out of a single cabinet and set it on the counter. You cannot judge what you own while it is stacked three deep behind a door.
As you unload, group similar items together: all the mugs in one spot, all the plastic containers in another. This begins categorization and saves a second pass later. If something belongs in a different room, walk it there now rather than starting a "miscellaneous" pile.
Step 2: Sort, Purge, and Donate
Pick up each item and make one call: keep, donate, or discard. The rules that work in practice:
- Keep if you used it in the last year and it works.
- Donate if it is clean, functional, and you simply do not use it.
- Discard if it is cracked, warped, missing a lid, or unsafe.
- Relocate anything that belongs in a pantry, garage, or another room.
The one-year rule handles most decisions; seasonal items are the exception, so keep those you genuinely use each year. Before donating, check what local charities accept, many take clean kitchenware but turn away damaged nonstick pans and frayed cords.
Step 3: Clean Cabinet Interiors
With the cabinet empty, you finally reach the surfaces that never get cleaned. Wipe down the shelves, back wall, door interior, and shelf edges, especially corners and undersides where grease collects.
Let surfaces dry completely before reloading, a damp shelf plus stacked plates means musty smells. Tighten any loose shelf hardware now too.
How to Organize Kitchen Cabinets by Category
Once the cabinet is empty and clean, organize kitchen cabinets by category rather than size or what fits. Categories create kitchen zones, and zones make a kitchen feel effortless.
Group items by what they do together: cooking tools near the stove, prep bowls near where you chop, everyday dishes near the dishwasher, baking gear in one place even across two shelves.
Then apply three placement rules:
- Daily use items go at waist to shoulder height, where you can reach them without bending or climbing.
- Seasonal items and rarely used appliances go on the highest or lowest shelves.
- Heavy items stay low, both for safety and because lifting a stand mixer off a high shelf is how people get hurt.
Within each category, use shelf risers and stackable bins for vertical storage so you can see everything at a glance. Keep like with like, and resist filling every inch, breathing room keeps a cabinet from reverting to chaos.
Best Kitchen Storage Solutions for a Functional Kitchen
The best kitchen storage solutions reduce the decisions you make while cooking: the right item is obvious, the wrong item out of the way. But whether a solution works or ends up in a garage pile comes down to three measurements you should take before buying anything.
Measure These Three Numbers First
- Shelf depth. Standard uppers run about 12 inches deep; base cabinets about 24 (hgtv.com). A bin deeper than your shelf will not sit flush, and a riser wider than the shelf will not fit.
- Clearance between shelves. The number people skip. Measure from the top of one shelf to the bottom of the shelf above it. Adjustable shelves move in one-inch increments, so relocating a pin gains height.
- Door clearance and hinge swing. A door rack adds depth to the door. If the door only opens 90 degrees because of a wall or appliance, a deep rack will collide with the cabinet's contents.
Write those three numbers down and take them to the store. A bin a half inch too tall sits in the garage.
Matching the Solution to the Job
| Solution | Best For | Where It Works | Trade-Off to Know |
|---|---|---|---|
| Shelf risers | Plates, mugs, cans | Upper cabinets | Adds height; useless if clearance is under 10 inches |
| Stackable bins | Packets, wraps, small tools | Deep shelves | Stacking hides the bottom bin; label the sides |
| Pull-out drawers | Pots, pans, lids | Base cabinets | Requires drilling or adhesive; check weight rating |
| Lazy susans | Oils, spices, jars | Corner cabinets | Full-round wastes corner space; use half-moon or kidney shapes |
| Door racks | Lids, foil, cutting boards | Cabinet doors | Reduces usable interior depth; skip on shallow cabinets |
| Adjustable dividers | Baking sheets, trays | Tall narrow cabinets | Tension-style can slip; screw-mounted holds better |
| Under-shelf baskets | Wrap, napkins, tea | Upper cabinets | Hangs below the shelf and eats clearance |
The Reach-Zone Rule
Placement matters as much as storage type. Divide each cabinet into three zones:
- Prime zone (waist to shoulder): everyday dishes, glasses, cooking tools. This is where you reach without bending or climbing.
- Secondary zone (above shoulder to about eye level): occasional items, serving pieces, backups.
- Stretch zone (top shelf and below-knee): seasonal items, heavy appliances, bulk storage.
Heavy items belong low, both for safety and because lifting a stand mixer off a high shelf is how people get hurt. Light, rarely used items belong high. If you are on a step stool daily, your prime zone is misassigned.
Small-Kitchen Specifics
For small kitchens, vertical and stackable storage does the heavy lifting. Choose modular pieces sized to standard cabinet dimensions rather than one-off organizers that fit a single shelf. Patterns that consistently work:
- Use a two-tier riser inside an upper cabinet to double the usable surface without adding depth.
- Convert one deep base cabinet into a pull-out system rather than stacking pots three deep.
- Mount a slim rack inside the cabinet door for lids and cutting boards, but only if door clearance allows.
Overcoming Psychological Barriers to Decluttering
The hardest part of decluttering is rarely physical. It is the voice saying you might need it someday, that it was a gift, that you paid good money for it.
Name the barrier and it loses power. The most common ones:
- Sunk cost. The money is already spent whether the item sits in your cabinet or goes to someone who will use it.
- Gift guilt. The person who gave it wanted you to have something useful. Passing it on honors that intent.
- Someday thinking. "Someday I'll host a dinner party for twelve" is not a plan. If you have not hosted in two years, the twelfth plate is not earning its shelf.
- Fear of waste. Donating a usable item is not waste. Keeping something you never touch is.
A useful trick: set a "maybe" box with a date on it. Anything you have not reached for by then leaves the kitchen. You are not deciding forever, just for now, enough to keep moving.
If a whole kitchen feels impossible, start with one drawer. Momentum beats motivation every time.
Maintaining a Clutter-Free Kitchen: Schedules and Habits
A decluttered kitchen stays decluttered through small habits, not annual heroics. Build a maintenance schedule that takes minutes, not hours, paired with a seasonal checklist so clutter never gets a full year to rebuild.
The Daily Reset
The daily habit matters most: a kitchen resets in five minutes if everything has a home, an hour if nothing does. The reset has three moves:
- Return every item to its assigned zone after cooking.
- Wipe the counter and one shelf while the coffee brews or the pasta water heats.
- Put anything without a home into a single "homeless" bin on the counter. Empty that bin weekly.
Labeling shelves and bins removes the ambiguity that causes piles. An item with no label and no zone will drift.
Weekly, Monthly, and Quarterly Rhythm
| Frequency | Task | Time |
|---|---|---|
| Daily | Return items to their zones after cooking | 5 minutes |
| Weekly | Clear and wipe one shelf or drawer; empty the homeless bin | 10 minutes |
| Monthly | Check the "maybe" box and donate; review one cabinet for expired or duplicate items | 20 minutes |
| Quarterly | Review one full cabinet end to end; re-measure clearance if you added anything | 45 minutes |
| Seasonally | Rotate seasonal items and appliances; run the full checklist below | 1 to 2 hours |
Pair maintenance with something you already do: wipe a shelf while the coffee brews, check the pantry before writing the grocery list. Small, repeatable actions keep space optimization from sliding back into clutter.
Seasonal Maintenance Checklist
Run this at the start of each season to catch the slow accumulation daily habits miss.
- Pull everything off the top shelf of each upper cabinet and wipe the shelf.
- Check the spice rack for jars older than a year; spices lose potency long before they look bad.
- Rotate seasonal bakeware, slow cookers, and holiday dishes to the stretch zone or out of the kitchen entirely.
- Test every small appliance you have not used since the last rotation. If it does not work, it goes.
- Check plastic containers for warping, cracks, or missing lids. Recycle what fails.
- Re-check the "maybe" box date and donate anything past it.
- Wipe the inside of cabinet doors and the underside of shelves, where grease collects.
- Tighten any loose shelf pins or hardware.
Relapse Triggers to Watch
Clutter returns through predictable doors. Knowing them makes them easier to close:
- The gift or hand-me-down. A new appliance or dish set arrives without a zone. Assign it one the same day, or it becomes permanent counter clutter.
- The bulk buy. A warehouse-club run adds three of something you use one of. Store the surplus in the stretch zone, not the prime zone.
- The "I'll deal with it later" pile. A single pile on the counter becomes two, then a drawer. The homeless bin exists to absorb this; empty it weekly.
- The seasonal swap that never swaps back. Holiday items go up and never come down. Put the return date on your calendar when you rotate.
Conclusion
The real challenge is not one big decluttering day, but the weeks afterward, when life gets busy and cabinets quietly refill. That is where a good system and the right tools carry the load.
Viva homeStore helps families build kitchens that stay functional, with practical storage solutions, shelf risers, and organization essentials designed to fit real cabinets and real routines.
Shop now at Viva homeStore and start with one cabinet. You will feel the difference before you finish the second one.
Frequently Asked Questions
What is the 3-3-3 rule for decluttering?
The 3-3-3 rule is a simple method: set a timer for 3 minutes, pick 3 items to discard, and repeat 3 times. It helps you start decluttering kitchen cabinets without feeling overwhelmed. For example, you might remove 3 expired spices, 3 unused gadgets, and 3 mismatched containers in each round. This approach builds momentum and makes the task manageable, especially if you have limited time.
Should I empty all cabinets at once when decluttering?
No, emptying all cabinets at once creates chaos and can be overwhelming. Instead, work on one cabinet at a time. Remove everything from a single cabinet, sort items, clean the interior, and put back only what you use. This method keeps your kitchen functional during the process and prevents you from feeling discouraged. It also makes it easier to spot duplicates and items you no longer need.
How do I start decluttering my kitchen when I feel overwhelmed?
Start small: pick one cabinet or even one shelf. Set a timer for 15 minutes and focus only on that area. Use a kitchen decluttering checklist to stay on track. For example, begin with the cabinet you open most often, like the one for daily dishes. As you remove items, ask if you've used them in the past year. This quick win builds confidence and motivates you to continue.
What is the hardest thing to get rid of when decluttering?
Sentimental items and expensive kitchen gadgets are often the hardest to part with. You might keep a bread maker you never use because it was a gift, or a set of dishes from a family member. To decide, ask if the item serves a purpose or brings joy. If it's purely sentimental, consider storing it elsewhere or taking a photo before donating. For gadgets, be honest about how often you actually use them.