

DIY Kitchen Organization Hacks With Kids: 2026 Guide
Table of Contents
- Accessible Kitchen Storage for Toddlers: Low Shelves, Bins, and Zones
- DIY Snack Station Ideas That Kids Can Actually Use
- Best Kitchen Organization Tools for Families: What Earns Its Space
- Budget DIY Kitchen Organization Hacks Using Recyclables
- Age-Appropriate Kitchen Organization Milestones for Kids
- Neurodivergent-Friendly Kitchen Organization Hacks
- Conclusion
- Frequently Asked Questions
Last Updated: September 23, 2026
Accessible Kitchen Storage for Toddlers: Low Shelves, Bins, and Zones
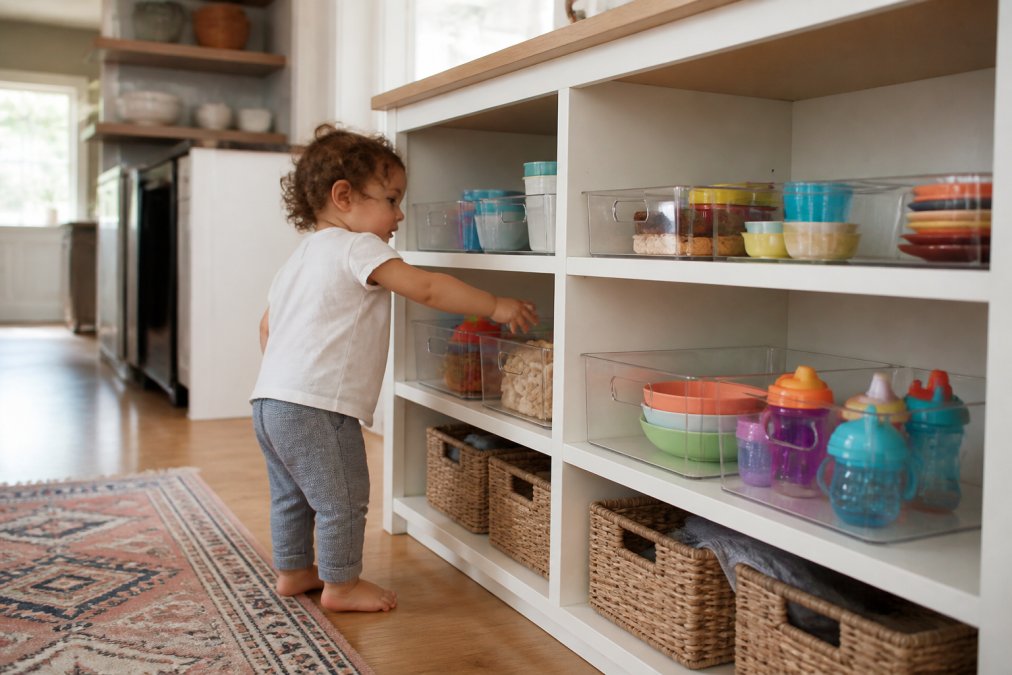
Accessible kitchen storage for toddlers means placing child-safe items on low, open shelves and inside clear bins that a two- or three-year-old can reach without climbing. This guide from Viva homeStore walks through the DIY kitchen organization hacks with kids that families actually stick with. A common mistake is storing everything at adult height, then wondering why kids drag stools across the floor.
DIY Snack Station Ideas That Kids Can Actually Use
A DIY snack station is a dedicated, toddler-height spot stocked with pre-portioned, parent-approved snacks that kids can grab on their own. The goal is independence without a mess, and it works best when you control what goes in, how much, and where it lives. The section most guides skip is the part that actually keeps the station working past week two: placement, portioning, and rotation.
Pick the right height and location first
Measure your child's shoulder height and set the station shelf so the top of the tallest bin sits just below it. For most two- and three-year-olds that lands between 24 and 30 inches off the floor. Anything higher invites climbing; anything lower means kids crouch and dump. Place the station on the end of a counter run or the bottom shelf of a pantry that is not in the main cooking path, so you are not stepping over a toddler during meal prep.
Build the station in four layers
- Top layer (eye level for the child): two clear stackable bins, one for shelf-stable snacks and one for fruit. Clear matters, kids take what they can see, and opaque bins get ignored.
- Middle layer: a small open basket for grab-and-go items like apples, string cheese, or granola bars. Keep it shallow so items do not pile up and hide each other.
- Bottom layer: a wipe-clean tray or rimmed baking sheet to catch crumbs. A rimmed sheet is easier to lift out and rinse than wiping the shelf itself.
- Side hook or small cup: a kid-sized cup or two within reach so kids pour their own water instead of asking.
Portion so kids take one, not the whole box
Pre-portion into small containers or snack bags before the week starts. A common pattern is one snack per container, sized so a single container is a single serving. This removes the "how much can I take" negotiation entirely. Refill the bins from the pantry, not the other way around, the station is a display, not storage.
Set a rotation rule that survives real life
Pick one day a week and restock the station in under five minutes. Toss anything past its date, wipe the tray, and refill the bins. If a snack sits untouched for two rotations, stop buying it, the station is a good test of what your kid actually eats. Keep the total number of snack types to three or four at a time; more than that and kids stall or dump everything looking for a favorite.
Safety and cleanup guardrails
The station works because it removes decisions. Your child sees two options, takes one, and puts the container in the "done" spot. That is the whole system, everything else is just maintenance.
Best Kitchen Organization Tools for Families: What Earns Its Space
The best kitchen organization tools for families are the ones that survive daily use and make items easier to reach, not just prettier to look at. Most families regret buying trendy organizers that crack, slide, or hide things kids need. The test is simple: does the tool reduce a decision, reduce a reach, or reduce a mess? If it does none of those, it is decoration.
The tools that actually earn their space
| Tool | Best For | Mechanism That Makes It Work | Watch Out For |
|---|---|---|---|
| Stackable clear bins | Snack zones, kid shelves | Visibility removes the "what's in here" dump | Cracking if dropped on tile; buy ones with rounded corners |
| Airtight pantry containers | Bulk dry goods, cereal | Seal keeps pests out and lets kids pour without spills | Higher upfront cost; measure shelf height before buying |
| Lazy Susan turntables | Deep corner cabinets, condiments | Rotation brings the back to the front without pulling everything out | Wasted corner space if the shelf is square; use two smaller ones instead of one large |
| Tension-rod drawer dividers | Separating kid utensils from adult knives | Spring tension holds the rod in place without drilling | Shifting if bumped hard; check tension monthly |
| Over-door cabinet racks | Dead door space, wraps and foil | Uses the door swing area that is otherwise empty | Blocking cabinet closure if the rack is too deep; measure door clearance |
| Under-shelf wire baskets | Stacking plates and bowls | Doubles usable shelf height in one move | Sagging under heavy loads; keep to lightweight items |
How to decide what to buy first
Start with the problem you hit every day, not the one that looks worst in photos. If your kid cannot reach their own cups, a low clear bin solves it for a few dollars. If your pantry is a wall of half-open boxes, airtight containers solve it but cost more. Rank your pain points for one week before buying anything.
The two tools most families underrate
A turntable earns its place in any deep cabinet. Kids spin it to reach the back instead of pulling everything onto the floor, and adults stop losing condiments behind the peanut butter. Tension-rod dividers keep kid-safe utensils apart from adult knives in the same drawer, which matters more than most parents expect, a shared drawer with no divider is the most common setup we see that leads to a cut.
The two tools most families regret
Adhesive hooks on textured or damp surfaces fail within weeks. The adhesive lets go, the hook drops, and whatever was hanging lands on the counter or the floor. If you need a hook, use one that screws in or clamps over a door. Deep single-compartment bins also disappoint, everything migrates to the bottom and kids give up reaching. Two shallow bins beat one deep one every time.
A note on safety-rated hardware
Cabinet locks, anchoring straps, and anti-tip brackets are not organization tools, but they belong in the same shopping trip. For cabinet locks and furniture anchoring basics, child safety guidance from the Consumer Product Safety Commission covers what to look for. Anchor any freestanding shelving unit your child can reach, a tipped shelf is the failure mode no bin can fix.
Budget DIY Kitchen Organization Hacks Using Recyclables
Budget DIY kitchen organization hacks start with what's already in your recycling bin. This is the angle most guides skip, and it's where families save the most.
Reach for these before you buy anything:
- Shoeboxes and small delivery boxes: cut down and wrapped, they become drawer dividers or bin inserts
- Glass jars: perfect for dry goods, and clear enough for kids to see what's inside
- Plastic tubs from produce or takeout: rinse well and use for snack portions
- Cardboard tubes: cut to length, they corral plastic wrap and foil
- Metal cans: sanded and painted, they hold utensils or pens
Age-Appropriate Kitchen Organization Milestones for Kids
Age-appropriate organization milestones give kids tasks that match what they can actually do, which builds the habit instead of the frustration. Pushing a four-year-old into full cleanup backfires; matching the job to the stage works.
- Ages 2-3: put toys or snacks back in one labeled bin
- Ages 4-5: sort utensils into the right drawer sections
- Ages 6-7: wipe counters and load unbreakable items into low shelves
- Ages 8-10: manage the snack station and help with pantry restocking
- Ages 11+: run a full zone reset and write the shopping list
Neurodivergent-Friendly Kitchen Organization Hacks
Neurodivergent-friendly kitchen organization reduces decisions and visual noise, because too many choices stall a task before it starts. Fewer, clearer options beat elaborate systems.
What works in practice:
- One bin, one category. Mixed bins create decision fatigue.
- Open storage over closed. If it's behind a door, it may as well not exist.
- Picture labels on everything, not just the kid shelf.
- A "done" zone where finished items go so nothing floats.
- Keep the routine identical day to day.
Conclusion
The hardest part of organizing a kitchen with kids isn't the setup, it's keeping it working after week three. Viva homeStore carries the practical pieces that hold up: stackable storage bins, airtight pantry containers, turntables, and drawer dividers built for daily family use. If you want storage that actually earns its space, browse the Viva homeStore collection and build a kitchen your kids can use on their own.
Frequently Asked Questions
What are some DIY kitchen organization hacks that work for small kitchens with kids?
In a small kitchen, use vertical space first. Mount hooks low for kids' aprons and cleaning cloths, hang an over-the-door organizer inside a cabinet for foil and wrap, and stack clear bins on shelves so kids can see and reach snacks. A turntable in a deep corner keeps condiments and baking supplies from disappearing. These moves cost little and free up counter space, which matters most when floor area is tight.
How can I make my kitchen more accessible for toddlers?
Start with accessible kitchen storage for toddlers at their height. Clear, stackable bins on a low shelf let a two- or three-year-old grab their own cup or snack without climbing. Add a step stool to the counter for supervised tasks. Keep sharp tools and cleaning supplies above counter height or behind a cabinet lock. Label bins with pictures so pre-readers can match items to spots and put things back on their own.
What are the best DIY snack station ideas for a family kitchen?
A DIY snack station works best when it sits at kid height and holds only pre-approved items. Use a clear stackable bin for grab-and-go snacks, a small turntable for fruit or bars, and a labeled jar for crackers. Add a mini trash bowl for wrappers and a cup holder for water bottles. Refresh it during your weekly cleaning routine so nothing goes stale. Keep the station to five or six choices so kids decide fast.
What kitchen organization tools actually hold up with kids in the house?
Look for tools that survive daily grabbing. Pantry containers with airtight seals and stacking capabilities help contain spills. Bottle organizers can prevent water bottles from avalanching when a child opens the cabinet. Drawer dividers keep kid-safe utensils separate from adult tools. Hooks that reposition as kids grow, with no drilling, are also useful. Skip anything with thin plastic or loose lids; those break first.