

How Long Do Meal Prep Meals Last in Freezer?
Table of Contents
- The Short Answer: Meal Prep Freezer Shelf Life by Category
- The 3-3-3 Rule and Why Freezer Time Limits Exist
- How to Prevent Freezer Burn on Meal Prep
- Best Freezer Safe Containers for Meal Prep
- Thawing Frozen Meal Prep Safely
- Reheating Methods by Meal Type
- Meal Prep Freezer Management and Organization
- Conclusion
- Frequently Asked Questions
Last Updated: September 5, 2026
The Short Answer: Meal Prep Freezer Shelf Life by Category
Most home cooks wonder how long meal prep meals last in the freezer before quality declines. While frozen food remains safe indefinitely at 0°F, texture, flavor, and nutritional value degrade over time. For best quality, cooked meals should be eaten within three to six months, though some items peak much earlier.
This guide from Viva homeStore breaks down realistic timelines by category, the science behind why limits exist, and the storage habits that keep batch cooking tasting fresh.
Ingredient-Level Freezer Life Chart
These are quality-based recommendations, not safety limits, food stored at a constant 0°F remains safe indefinitely, but these are the windows where texture and flavor hold up best.
| Ingredient | Optimal Freezer Life | Quality Notes | Best Container Type |
|---|---|---|---|
| Cooked ground beef or turkey | 2-3 months | Fat oxidizes, causing off-flavors after 3 months | Vacuum-sealed bag or rigid container with minimal headspace |
| Cooked chicken breast (sliced or cubed) | 2-3 months | Dries out faster than dark meat; consider adding sauce or broth | Glass container with liquid to cover |
| Cooked pork chops or loin | 2-3 months | Lean cuts lose moisture quickly; wrap tightly | Plastic wrap then foil, or vacuum seal |
| Cooked salmon or white fish | 1-2 months | Delicate proteins degrade fastest; freeze in individual portions | Vacuum-sealed bag |
| Soups, stews, and chili | 3-4 months | Flavor holds well; vegetables lose crispness | Wide-mouth mason jar (leave 1 inch headroom) or rigid plastic |
| Cooked rice (white or brown) | 1-2 months | Brown rice goes rancid faster due to higher oil content | Flat, resealable freezer bag, pressed thin |
| Cooked quinoa or farro | 1-2 months | Dries out fastest; refresh with water when reheating | Flat, resealable freezer bag |
| Cooked pasta (tossed with sauce) | 2-3 months | Sauce protects texture; plain pasta turns mushy | Rigid container with sauce mixed in |
| Cooked beans (black, kidney, chickpeas) | 3-4 months | Hold up well; freeze in cooking liquid | Rigid container or freezer bag |
| Egg muffins or frittata | 1-2 months | Eggs can become rubbery; reheat from frozen | Muffin tin flash freeze, then transfer to bag |
| Pancakes or waffles | 1-2 months | Stack with parchment between layers | Resealable freezer bag |
| Raw marinated chicken or beef | 3-6 months | Marinade acts as a protective barrier; freeze on day of prep | Vacuum-sealed bag or freezer bag with air pressed out |
| Raw ground meat (unseasoned) | 3-4 months | Freeze in 1-pound flat portions for quick thawing | Press flat in a freezer bag |
| Cooked vegetables (roasted or steamed) | 2-3 months | Texture softens; best used in soups or stir-fries | Rigid container |
| Dairy-based sauces (alfredo, cream soups) | 1-2 months | May separate upon thawing; reheat slowly and whisk | Rigid container |
The Science of Nutritional Degradation
Freezing does not destroy vitamins instantly, but it does accelerate a slow decline. Water-soluble vitamins, particularly vitamin C and several B vitamins (thiamin, folate), are the most vulnerable. Studies on frozen produce show that vitamin C can degrade by 20-30% over 6-12 months of frozen storage, even at 0°F.
- Month 1-2: Nutritional loss is negligible. Your frozen stir-fry retains nearly all its original vitamin content.
- Month 3-6: Expect measurable declines in vitamin C and B vitamins. Fat-soluble vitamins (A, D, E, K) and minerals like iron and potassium remain largely stable.
- Month 6+: The decline continues, but the bigger issue is that the food's texture and flavor have degraded to the point where you may not want to eat it, which defeats the purpose of meal prep.
This is why the 3-month window is the sweet spot for maximum convenience without sacrificing nutritional value.
Why the 3-Month Rule Is the Practical Ceiling
Some sources say cooked meals last 4-6 months, but that ignores the quality cliff around the 3-month mark. Ice crystals continue to grow slowly even at 0°F, a process called recrystallization. Temperature fluctuations cause small ice crystals to melt and refreeze into larger ones that puncture cell walls, making a thawed meal from month 4 taste watery and mushy.
Plan your freezer inventory around a 3-month rolling window so everything gets eaten within that period, preventing the "mystery container" problem that leads to waste.
The 3-3-3 Rule and Why Freezer Time Limits Exist
The 3-3-3 rule is a simple memory aid: freeze within 3 hours of cooking, store for up to 3 months, and thaw in the refrigerator for up to 3 days before eating.
Freezer time limits exist for two reasons. First, ice crystals form slowly inside food even at 0°F, rupturing cell walls and causing moisture loss. Second, enzymatic activity continues at freezing temperatures, gradually breaking down proteins and fats. According to USDA food storage guidelines, food kept frozen at 0°F is safe indefinitely, but the agency's quality-focused charts recommend far shorter windows for cooked dishes.
Your freezer is a pause button, not a time machine. A beef stew frozen for a week tastes nearly identical to fresh; frozen for eight months, it develops a flat, watery flavor no reheating method can fix.
How to Prevent Freezer Burn on Meal Prep
Freezer burn happens when air reaches the food's surface, causing dehydration and oxidation. It shows up as dry, grayish-white patches and a papery texture, ruining the eating experience.
Prevention comes down to three habits:
- Remove as much air as possible before sealing. Squeeze bags flat or use a vacuum sealer for long-term storage.
- Choose the right container size. A half-full large container traps excess air. Match the container to the portion.
- Cool food completely before freezing. Trapped steam turns to ice crystals on the surface, accelerating moisture loss.
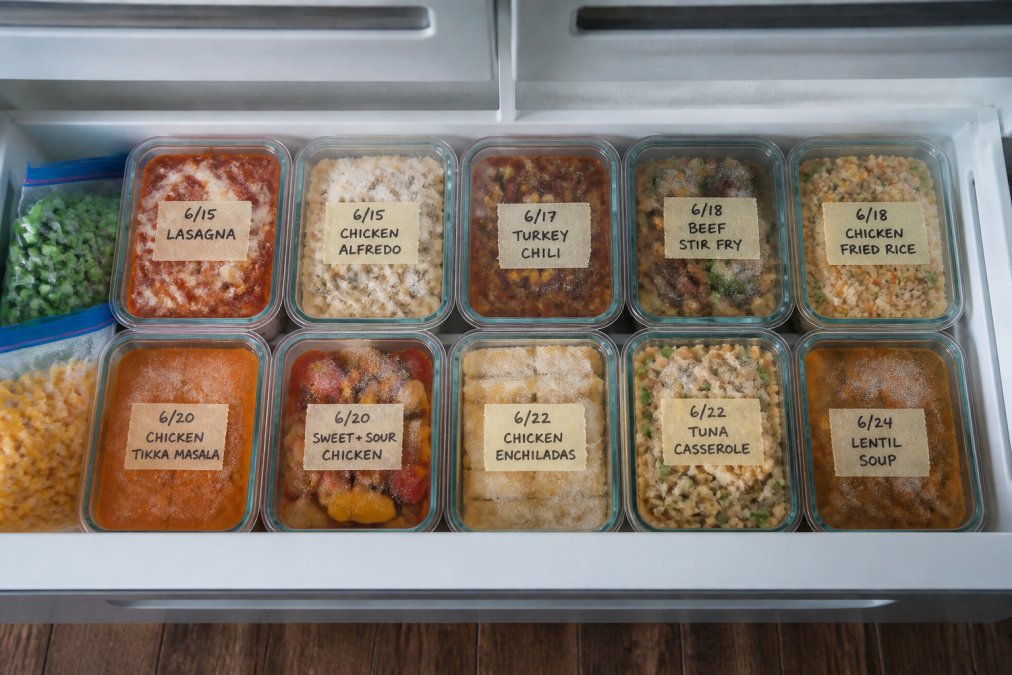
A common mistake is skipping the labeling step. Write the dish name and freeze date on every package with a permanent marker. You will not remember what that foil tray holds in three months, and guessing leads to waste. The USDA's freezer storage chart lists specific quality timelines for dozens of foods, making it a useful reference when planning your batch cooking menu.
Best Freezer Safe Containers for Meal Prep
The best freezer safe containers are rigid, airtight, and rated for cold temperatures. Glass containers with locking lids are the gold standard for reheating convenience. Wide-mouth mason jars work well for soups and stews, but leave at least an inch of headroom for expansion.
For space-conscious freezers, silicone bags and stackable plastic containers beat round bowls. Look for BPA-free containers and check that lids stay flexible at freezing temperatures.
Airtight containers slow moisture loss dramatically compared to loosely wrapped foil or deli tubs. If you batch cook weekly, invest in a set of uniform containers that nest when empty.
Thawing Frozen Meal Prep Safely
Thawing frozen meal prep safely means keeping food out of the temperature danger zone, between 40°F and 140°F. The refrigerator is the only recommended method for overnight thawing; most single portions thaw in 12 to 24 hours.
For same-day meals, submerge the sealed container in cold tap water, changing the water every 30 minutes. Small portions thaw in about an hour. The microwave defrost setting works in a pinch but degrades texture.
Never thaw meal prep on the counter at room temperature. The exterior warms into the danger zone while the interior remains frozen, creating ideal conditions for bacterial growth. According to USDA thawing guidelines, food thawed by any method should be cooked before refreezing.
Reheating Methods by Meal Type
Soups and stews reheat best on the stovetop over medium-low heat. Rice and grain dishes need moisture added back, so sprinkle in a tablespoon of water before microwaving or steaming.
Casseroles and baked pasta should go in a 350°F oven, covered with foil for the first half of reheating. For crispy items like breaded chicken or fried rice, use a skillet or air fryer rather than the microwave.
| Meal Type | Best Reheating Method | Time | Key Tip |
|---|---|---|---|
| Soups and stews | Stovetop, medium-low | 5-10 min | Stir frequently |
| Rice and grains | Microwave with water | 2-3 min | Add 1 tbsp water |
| Casseroles | Oven at 350°F | 15-20 min | Cover with foil |
| Breaded proteins | Air fryer or skillet | 5-8 min | Reheat from thawed |
| Breakfast items | Toaster or microwave | 1-2 min | Toast for crispness |
Always reheat leftovers to an internal temperature of 165°F, which the CDC food safety guidance identifies as the safe threshold for leftovers. A food thermometer removes the guesswork and ensures every bite is safe to eat.
Meal Prep Freezer Management and Organization
A disorganized freezer defeats the purpose of meal prep. When you cannot find what you need, you order takeout instead.
The Energy Efficiency Angle: Why a Full Freezer Is Cheaper to Run
Your freezer runs more efficiently when it's full. Frozen food acts as a thermal battery, helping pull the temperature back down quickly after the door opens. An empty freezer has less thermal mass, so the compressor works harder and longer to recover.
Fill empty freezer space with sealed jugs of water. They freeze into ice blocks that maintain temperature and can be moved aside when you need the space.
The 15-Minute Inventory System
The system that works is a simple whiteboard or dry-erase sheet on the freezer door:
- When you freeze a batch: Write the dish name and date on the board in the appropriate column (Breakfast, Lunch, Dinner).
- When you pull a meal to thaw: Cross it off the board immediately.
- Weekly check: Every Sunday, glance at the board. Anything older than 10 weeks moves to the front of the freezer so it gets eaten first.
This takes two minutes per batch and prevents the most common waste pattern: discovering a forgotten meal 8 months later and throwing it out.
Zone-Based Organization for Small Freezers
If you have a standard refrigerator freezer, space is your biggest constraint. Group meals by type using labeled bins or shelf dividers:
- Zone 1 (Top shelf or door): Breakfast items, egg muffins, pancakes, smoothie packs.
- Zone 2 (Middle shelf): Lunch portions, soups, grain bowls, individual servings.
- Zone 3 (Bottom drawer or back): Dinner casseroles and proteins.
For small freezers, prioritize flat, stackable containers over round ones. A 2-cup round deli container wastes vertical space; a flat, 2-cup rectangular container stacks cleanly.
The First-In, First-Out (FIFO) Rotation Method
FIFO is the gold standard for commercial kitchens. Newer meals go to the back or bottom; older meals move to the front or top, ensuring nothing sits past its 3-month quality window.
When you put a new batch in the freezer, physically move older containers forward at the same time. This takes 30 seconds per batch and keeps the system self-maintaining.
Defrosting and Maintenance for Efficiency
Frost buildup acts as an insulator, forcing the compressor to work harder. The USDA recommends keeping freezer temperature at 0°F or below. If you have a manual-defrost freezer, defrost it before frost buildup exceeds a quarter inch, about once a year for most households.
Other maintenance habits that keep your freezer running efficiently:
- Keep the door open as briefly as possible. Every second the door is open, cold air escapes and warm, humid air enters. That humidity turns to frost on the coils and food surfaces.
- Check the door seal. A worn or cracked gasket lets cold air leak out continuously. Test it by closing the door on a dollar bill, if it slides out easily, the seal needs replacing.
- Cool food completely before freezing. Putting warm food in the freezer forces the compressor to run continuously to pull the temperature down, which spikes your energy use and creates frost.
The Real Cost of Disorganization
The average American household wastes an estimated $1,300 per year on food that gets thrown out, according to the USDA's Economic Research Service. A disorganized freezer is a major contributor: you buy duplicates, throw away mystery containers, and order takeout when you can't find the meal you planned.
A 15-minute weekly organization habit, checking the inventory board, moving older items forward, and wiping down spills, pays for itself many times over in reduced waste and lower energy bills.
Conclusion
Meal prep freezing works brilliantly when you respect its limits. Cooked meals are best eaten within three months, protected from air by quality containers, thawed in the refrigerator, and reheated to 165°F using a method suited to the dish.
Viva homeStore carries practical storage solutions that make freezer organization straightforward, from airtight glass containers to space-saving stackable bins. Our focus on functional home essentials helps families simplify daily tasks and keep every meal fresh. Explore our selection and build a meal prep system that fits your kitchen, your schedule, and your appetite.
Frequently Asked Questions
What is the 3-3-3 rule for meal prep?
The 3-3-3 rule is a simple memory aid for food storage: freeze meals within 3 hours of cooking, eat refrigerated leftovers within 3 days, and consume frozen meal prep within 3 months. The 3-month freezer window is a safe guideline for most home-cooked dishes to maintain best quality, though properly frozen meals remain safe to eat beyond that with some texture and flavor changes.
How long do meal prep meals last in the freezer before freezer burn?
Most meal prep meals last 2 to 3 months in the freezer before noticeable freezer burn develops, depending on packaging. Freezer burn happens when air reaches the food surface, causing moisture loss and ice crystals. Using airtight containers, removing excess air from bags, and keeping your freezer at 0°F or below extends quality. Vacuum sealing is an effective method for long-term storage.
Can you freeze meal prep for more than 3 months?
Yes, frozen meal prep remains safe to eat indefinitely at 0°F, but quality declines after 3 months. Texture degradation and flavor loss become noticeable, especially in dishes with sauces, vegetables, or dairy. For best results, label containers with dates and rotate older meals to the front. If meals sit longer than 3 months, check for ice crystals and off-odors before reheating.
What are the best containers for long-term freezer storage?
The best freezer safe containers for meal prep are rigid plastic or glass containers with airtight, snap-lock lids, and heavy-duty freezer bags. Glass containers work well for reheating but need headroom for food expansion. Plastic containers should be BPA-free and labeled freezer-safe. For maximum protection against freezer burn, vacuum-sealed bags are a highly effective option by removing air completely.
Getting freezer storage right is about consistency, not complexity. The payoff is real: less cooking time during the week, less money wasted on spoiled food, and meals that taste homemade even on your busiest nights. Viva homeStore offers the containers, labels, and organization tools that support a lasting meal prep routine. Get started with Viva homeStore and turn your freezer into the most useful appliance in your kitchen.
This article was written using GrandRanker